
Understanding Vapor Barrier Installation
In the realm of home maintenance, ensuring the integrity of your crawl space is paramount, especially in areas prone to high humidity and moisture. One effective solution to combat moisture damage is through Vapor Barrier Installation. This guide delves deep into understanding what vapor barriers are, their benefits, and practical strategies for successful installation.
What is a Vapor Barrier?
A vapor barrier is a material designed to prevent moisture from passing through walls, ceilings, and floors, thereby protecting your home from the damaging effects of excess humidity. Typically made of polyethylene plastic, these barriers are common in crawl spaces, basements, and even attics. By halting the migration of moisture, vapor barriers play a crucial role in maintaining the structural integrity of your home and preventing mold growth.
Benefits of Vapor Barrier Installation
- Mold Prevention: One of the main benefits of vapor barriers is that they greatly reduce the likelihood of mold and mildew growth, thus protecting indoor air quality.
- Energy Efficiency: By contending with moisture, vapor barriers enhance the energy efficiency of your home, leading to lower energy bills.
- Structural Integrity: Implementing a vapor barrier can prolong the lifespan of your home’s structure by preventing wood rot and other forms of deterioration associated with moisture damage.
- Increased Home Value: A well-maintained crawl space adds to the overall market value of your property, making it more attractive to potential buyers.
Common Myths about Vapor Barriers
Despite the benefits of vapor barriers, several misconceptions can deter homeowners from proceeding with installation:
- Myth 1: Vapor barriers can trap moisture. This is incorrect; they are designed to block moist air from entering.
- Myth 2: Installation is unnecessary in dry climates. Even in dry areas, vapor barriers can be beneficial for areas where moisture is generated internally.
- Myth 3: Only basement installations are beneficial. Crawl spaces also require vapor barriers for optimal moisture control.
Preparing for Vapor Barrier Installation
Assessing Your Crawl Space
Before you begin the installation process, evaluating your crawl space is crucial. Look for signs of existing moisture, such as water stains, wet insulation, or mold growth. This preliminary assessment will inform the overall installation strategy and highlight any additional remediation needed.
Gathering Necessary Tools and Materials
Equipping yourself with the right tools and materials is key for a successful installation. Here’s a checklist to help:
- Polyethylene sheeting (minimum thickness of 6 mil)
- Utility knife
- Measuring tape
- Stapler or duct tape
- Gloves and safety goggles
Planning the Installation Process
Preparation is vital for a smooth installation. Begin by measuring the area of the crawl space to determine how much vapor barrier material will be required. Plan the layout of the barrier, ensuring it covers the entire ground area and overlaps at the seams to prevent moisture from seeping through.
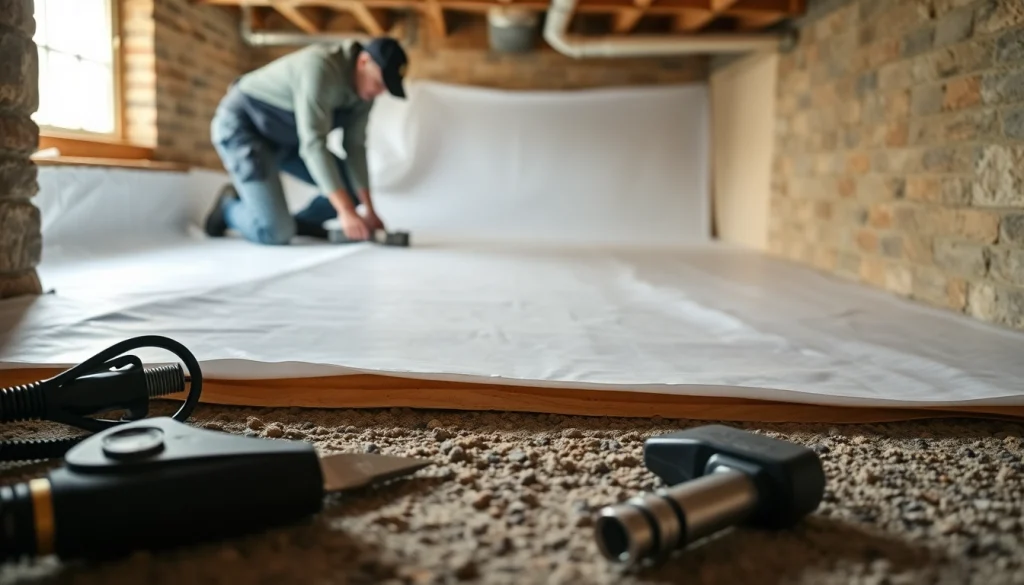
Vapor Barrier Installation Techniques
Step-by-Step Installation Guide
- Clear the Crawl Space: Remove any debris, old insulation, or standing water before beginning.
- Measure and Cut: Based on your previous measurements, cut the polyethylene sheeting to the required sizes.
- Lay Down the Vapor Barrier: Start at one end of the crawl space, placing the barrier flat against the ground.
- Seal the Seams: Overlap the sheets by at least 12 inches and use duct tape or staples to seal the seams well.
- Install Around Obstacles: Carefully cut around any pipes or supports, ensuring you keep the barrier intact and sealed.
- Final Touches: Ensure that the entire area is covered, and secure the edges by tacking them down with insulation or adding an additional layer if necessary.
Common Mistakes to Avoid
During vapor barrier installation, it’s easy to make mistakes that can compromise its effectiveness:
- Improper Sealing: Failing to properly seal seams can allow moisture to penetrate.
- Using Insufficient Material Thickness: Thin sheeting can tear or degrade over time.
- Insufficient Coverage: Not covering the entire ground area leads to gaps where moisture can escape or enter.
How to Ensure Proper Sealing
To maximize the effectiveness of your vapor barrier, pay special attention to sealing:
- Overlap sheets and ensure they are secured using high-quality duct tape.
- Use a continuous piece of sheeting wherever possible to minimize seams.
- Include a sealing method around all supports and conduits that penetrate the barrier.
Post-Installation Considerations
Maintaining Your Vapor Barrier
After installation, regular checks are necessary to ensure your vapor barrier remains effective. Assess for tears, leaks, or signs of moisture that could indicate problems. A biannual inspection is recommended for optimal results.
Recognizing Signs of Damage
Stay alert for indicators that your vapor barrier might not be performing well. Key signs include:
- Mold growth on the barrier or surrounding materials.
- Visible condensation on floors and walls.
- Unpleasant odors emanating from the crawl space.
When to Reinstall a Vapor Barrier
If damage is identified, or if you’re noticing persistent moisture issues, consider reinstalling your vapor barrier. Generally, barriers are expected to last several years but should be replaced if they show significant wear or are compromised by flooding.
FAQs about Vapor Barrier Installation
How long does a vapor barrier last?
A vapor barrier typically lasts between 15 to 20 years if installed correctly and maintained regularly. Regular inspections can help identify any issues early on.
Can I install a vapor barrier myself?
Yes, vapor barrier installation can be a DIY project with proper planning, tools, and dedication to detail, making it accessible for homeowners.
What type of vapor barrier is best for my area?
The best vapor barrier type for your area depends on local climate conditions. Typically, 6-12 mil polyethylene works well in most regions.
Are there any regulations for vapor barrier installation?
Building codes may specify vapor barrier installation practices, especially in areas prone to moisture issues. Check local regulations before proceeding.
How do I know if my existing barrier is effective?
Check for visible moisture, mold growth, or musty odors. If any signs are present, you may need to replace or repair the barrier for optimum performance.